Get started

Basic setup example

Basic example image

Open it in a new tab

HTML

The HTML set up is pretty easy. Just create a div that will hold your canvas and a div that will hold your images.

<body>
<!-- div that will hold our WebGL canvas -->
<div id="canvas"></div>
<!-- div used to create our plane -->
<div class="plane">
<!-- image that will be used as texture by our plane -->
<img src="path/to/my-image.jpg" crossorigin="" />
</div>
</body>

CSS

The CSS is also very easy. Make sure the div that will wrap the canvas fits the document, and apply any size you want to your plane div element.

body {
/* make the body fits our viewport */
position: relative;
width: 100%;
height: 100vh;
margin: 0;
overflow: hidden;
}
#canvas {
/* make the canvas wrapper fits the document */
position: absolute;
top: 0;
right: 0;
bottom: 0;
left: 0;
}
.plane {
/* define the size of your plane */
width: 80%;
height: 80vh;
margin: 10vh auto;
}
.plane img {
/* hide the img element */
display: none;
}

Javascript

There's a bit more work in the javascript part : we need to instanciate our WebGL context, create a plane with basic uniforms parameters and use it.

import {Curtains, Plane} from "curtainsjs";
// wait for everything to be ready
window.addEventListener("load", () => {
// set up our WebGL context and append the canvas to our wrapper
const curtains = new Curtains({
container: "canvas"
});
// get our plane element
const planeElement = document.getElementsByClassName("plane")[0];
// set our initial parameters (basic uniforms)
const params = {
vertexShaderID: "plane-vs", // our vertex shader ID
fragmentShaderID: "plane-fs", // our fragment shader ID
uniforms: {
time: {
name: "uTime", // uniform name that will be passed to our shaders
type: "1f", // this means our uniform is a float
value: 0,
},
},
};
// create our plane using our curtains object, the HTML element and the parameters
const plane = new Plane(curtains, planeElement, params);
plane.onRender(() => {
// use the onRender method of our plane fired at each requestAnimationFrame call
plane.uniforms.time.value++; // update our time uniform value
});
});

Shaders

Here are some basic vertex and fragment shaders. Just put it inside your body tag, right before you include the library.

<!-- vertex shader -->
<script id="plane-vs" type="x-shader/x-vertex">
precision mediump float;
// those are the mandatory attributes that the lib sets
attribute vec3 aVertexPosition;
attribute vec2 aTextureCoord;
// those are mandatory uniforms that the lib sets and that contain our model view and projection matrix
uniform mat4 uMVMatrix;
uniform mat4 uPMatrix;
// our texture matrix that will handle image cover
uniform mat4 uTextureMatrix0;
// pass your vertex and texture coords to the fragment shader
varying vec3 vVertexPosition;
varying vec2 vTextureCoord;
void main() {
vec3 vertexPosition = aVertexPosition;
gl_Position = uPMatrix * uMVMatrix * vec4(vertexPosition, 1.0);
// set the varyings
// here we use our texture matrix to calculate the accurate texture coords
vTextureCoord = (uTextureMatrix0 * vec4(aTextureCoord, 0.0, 1.0)).xy;
vVertexPosition = vertexPosition;
}
</script>
<!-- fragment shader -->
<script id="plane-fs" type="x-shader/x-fragment">
precision mediump float;
// get our varyings
varying vec3 vVertexPosition;
varying vec2 vTextureCoord;
// the uniform we declared inside our javascript
uniform float uTime;
// our texture sampler (default name, to use a different name please refer to the documentation)
uniform sampler2D uSampler0;
void main() {
// get our texture coords from our varying
vec2 textureCoord = vTextureCoord;
// displace our pixels along the X axis based on our time uniform
// textures coords are ranging from 0.0 to 1.0 on both axis
textureCoord.x += sin(textureCoord.y * 25.0) * cos(textureCoord.x * 25.0) * (cos(uTime / 50.0)) / 25.0;
// map our texture with the texture matrix coords
gl_FragColor = texture2D(uSampler0, textureCoord);
}
</script>

Et voilĂ  !

About the plane's attributes : aVertexPosition and aTextureCoord

In our basic example above, we've passed the two plane's attributes aVertexPosition and aTextureCoord as vVertexPosition and vTextureCoord varyings to our fragment shader, even tho we did not really use vVertexPosition in the end. But what are those attributes and what do they mean?

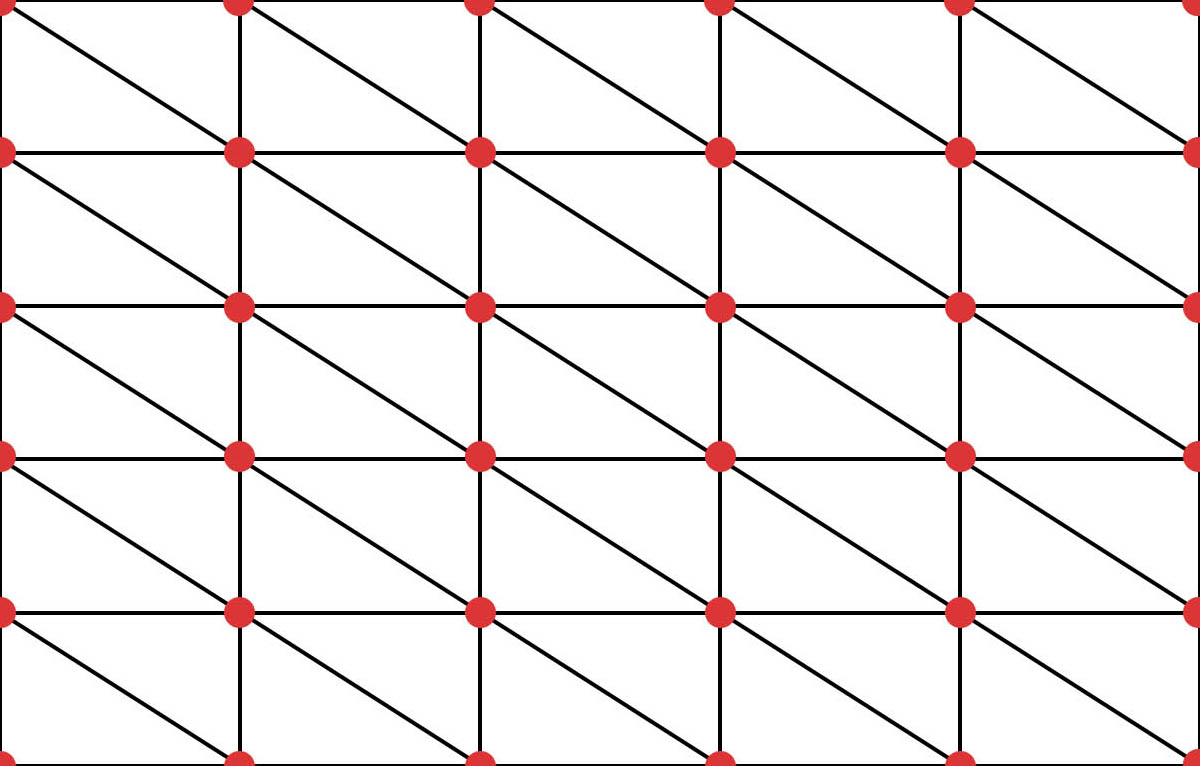
aVertexPosition: the plane vertices coordinates

Those are the plane's original vertices positions. Multiplying them by the projection and model view matrices in our vertex shader correctly position our plane in the world space:

gl_Position = uPMatrix * uMVMatrix * vec4(aVertexPosition, 1.0);

The plane's vertices positions are ranging from -1 to 1 on both X and Y axis (Z value is equal to 0 by default), [-1, -1] being the bottom left corner while [1, 1] is the top right corner, whatever its size, position and scale.

Here is an example where we animate the plane vertices Z position using a sinusoidal function, based on its coordinates along the X axis and a time uniform:

vec3 vertexPosition = aVertexPosition;
vertexPosition.z = sin(vertexPosition.x * 3.141592 + uTime * 0.0375) * 0.05;
gl_Position = uPMatrix * uMVMatrix * vec4(vertexPosition, 1.0);
Vertices position helper plane illustration {x: -1, y: -1} {x: 1, y: -1} {x: -1, y: 1} {x: 1, y: 1}

aTextureCoord: the plane texture coordinates

Those are defining the plane's texture coordinates. They are ranging from 0 to 1 on both X and Y axis, [0, 0] being the bottom left corner while [1, 1] is the top right corner.

Texture coordinates could be helpful to draw geometric shapes, gradients and such.

Here is an example where the RGB values of our displayed color is based on the Y component of our texture coordinates:

gl_FragColor = vec4(vec3(vTextureCoord.y), 1.0);
{x: 0, y: 0} {x: 1, y: 0} {x: 0, y: 1} {x: 1, y: 1}

Using texture matrices to pass texture coordinates as a varying

Another thing you need to understand is that when you multiply your texture coordinates with a texture matrix, they won't necessarily be ranging from 0 to 1 on both axis any more, since they will actually be scaled to correctly map your texture:

// here vTextureCoord won't necessarily be ranging from 0 to 1 on both axis
// since it has been scaled
vTextureCoord = (uTextureMatrix0 * vec4(aTextureCoord, 0.0, 1.0)).xy;

If you want to correctly map you texture and also get accurate texture coordinates at the same time (ie to draw geometric shapes for example), consider passing 2 varyings:

// use vOriginalTextureCoord (ranging from 0 to 1 on both axis) to draw geometric shapes
vOriginalTextureCoord = aTextureCoord;
// use vTextureCoord to map your uSampler0 texture
vTextureCoord = (uTextureMatrix0 * vec4(aTextureCoord, 0.0, 1.0)).xy;

What about gl_FragCoord then?

In some examples online, such as the one in the Book of Shaders, you'll see the texture coordinates (also called UV, or ST due to some naming conflict) being calculated using the gl_FragCoord fragment shader global variable and the resolution uniform:

// calculate UV based on gl_FragCoord and uResolution uniform
vec2 st = gl_FragCoord.xy / uResolution.xy;

Here, gl_FragCoord.xy is the pixel coordinate along X and Y axis along the canvas.
If your plane has the same size and position as your rendering canvas, you might use this method to compute your coordinates. But if it doesn't, you'll have to take into account the plane's offset, leading to unnecessary calculations.

You should therefore always use the built-in aTextureCoord attributes.

Textures uniforms matrices and sampler names

Let's say you want to build a slideshow with 3 images and a displacement image to create a nice transition effect.
By default, the textures uniforms matrices and sampler will be named upon their indexes inside your plane element. If you got something like that :

<!-- div used to create our plane -->
<div class="plane">
<!-- images that will be used as textures by our plane -->
<img src="path/to/displacement.jpg" crossorigin="" />
<img src="path/to/my-image-1.jpg" crossorigin="" />
<img src="path/to/my-image-2.jpg" crossorigin="" />
<img src="path/to/my-image-3.jpg" crossorigin="" />
</div>

Then, in your shaders, your textures matrices and samplers would have to be declared that way :

// use this in your vertex shader
uniform mat4 uTextureMatrix0; // texture matrix of displacement.jpg
uniform mat4 uTextureMatrix1; // texture matrix of my-image-1.jpg
uniform mat4 uTextureMatrix2; // texture matrix of my-image-2.jpg
uniform mat4 uTextureMatrix3; // texture matrix of my-image-3.jpg
...
// use this in your fragment shader
uniform sampler2D uSampler0; // bound to displacement.jpg
uniform sampler2D uSampler1; // bound to my-image-1.jpg
uniform sampler2D uSampler2; // bound to my-image-2.jpg
uniform sampler2D uSampler3; // bound to my-image-3.jpg

It is handy but you could also get easily confused.
By using a data-sampler attribute on the <img /> tag, you could specify custom uniforms matrices and samplers names to use in your shaders. With the example above, this would become :

<!-- div used to create our plane -->
<div class="plane">
<!-- images that will be used as textures by our plane -->
<img src="path/to/displacement.jpg" crossorigin="" data-sampler="uDisplacement" />
<img src="path/to/my-image-1.jpg" crossorigin="" data-sampler="uSlide1" />
<img src="path/to/my-image-2.jpg" crossorigin="" data-sampler="uSlide2" />
<img src="path/to/my-image-3.jpg" crossorigin="" data-sampler="uLastSlide" />
</div>
// use this in your vertex shader
uniform mat4 uDisplacementMatrix; // texture matrix of displacement.jpg
uniform mat4 uSlide1Matrix;       // texture matrix of my-image-1.jpg
uniform mat4 uSlide2Matrix;       // texture matrix of my-image-2.jpg
uniform mat4 uLastSlideMatrix;    // texture matrix of my-image-3.jpg
...
// use this in your fragment shader
uniform sampler2D uDisplacement; // bound to displacement.jpg
uniform sampler2D uSlide1;       // bound to my-image-1.jpg
uniform sampler2D uSlide2;       // bound to my-image-2.jpg
uniform sampler2D uLastSlide;    // bound to my-image-3.jpg

Handling scroll event

By default since version 4.0 your planes positions are now updated while you scroll the page. You can define each plane ability to update its position according to the scroll by setting its own watchScroll property.

This means that the library automatically listens to the scroll event. But you might not want to listen to that event at all and handle this by yourself:

Doing it your own way

If you don't want the library to listen to the scroll under the hood, just set the watchScroll parameter to false when initializing your Curtains object. You will then have to listen to the scroll by yourself and update your curtains object scroll values manually.
This could be pretty handy if you're using a virtual scroll library for example like here: Multiple planes scroll effect with Locomotive scroll.

import {Curtains, Plane} from "curtainsjs";
// wait for everything to be ready
window.addEventListener("load", () => {
// set up our WebGL context and append the canvas to our wrapper
const curtains = new Curtains({
container: "canvas",
watchScroll: false
});
// get our plane element
const planeElement = document.getElementsByClassName("plane")[0];
// set our initial parameters (basic uniforms)
const params = {
vertexShaderID: "plane-vs", // our vertex shader ID
fragmentShaderID: "plane-fs", // our fragment shader ID
uniforms: {
time: {
name: "uTime", // uniform name that will be passed to our shaders
type: "1f", // this means our uniform is a float
value: 0,
},
},
};
// create our plane using our curtains object, the HTML element and the parameters
const plane = new Plane(curtains, planeElement, params);
plane.onRender(() => {
// use the onRender method of our plane fired at each requestAnimationFrame call
plane.uniforms.time.value++; // update our time uniform value
});
// listen to the scroll event
// could be your virtual scroll library custom scroll event
window.addEventListener("scroll", () => {
// get our scroll values
var scrollValues = {
x: window.pageXOffset,
y: window.pageYOffset,
};
// pass those values to the lib
curtains.updateScrollValues(scrollValues.x, scrollValues.y);
});
});

Note that this is how the library handles the scroll internally by default.
This is the most performant way to keep your whole scene in sync with the scroll as it requires only one layout repaint call.

Using videos as textures

Yes, videos as textures are supported ! However there are a few downsides you need to know.
First, you might encounter some trouble trying to autoplay videos without a user gesture on most mobile devices. Unless you don't care about mobile users, you will have to start the videos playback after a user interaction like a click event.
Also, please note that videos tend to use a lot of memory and could have a significant impact on performance, so try to keep them small.
Besides that, videos are really easy to use (and can be mixed with images as well). Let's see how we can handle them :

HTML

<!-- div used to create our plane -->
<div class="plane">
<!-- video that will be used as texture by our plane -->
<video src="path/to/my-video.mp4" crossorigin=""></video>
</div>

Like with images, you can use a data-sampler attribute to set a uniform sampler name. You can use one or more videos, or mixed them with images if you want :

<!-- div used to create our plane -->
<div class="plane">
<!-- elements that will be used as textures by our plane -->
<img src="path/to/displacement.jpg" data-sampler="uDisplacement" crossorigin="" />
<video src="path/to/my-video-1.mp4" data-sampler="uFirstVideo" crossorigin=""></video>
<video src="path/to/my-video-2.mp4" data-sampler="uSecondVideo" crossorigin=""></video>
</div>

Javascript

There's only one change inside our javascript : we need to tell our plane when to start playing the videos. We've got a playVideos method that we will put inside an event listener in our onReady method :

import {Curtains, Plane} from "curtainsjs";
// wait for everything to be ready
window.addEventListener("load", () => {
// set up our WebGL context and append the canvas to our wrapper
const curtains = new Curtains({
container: "canvas"
});
// get our plane element
const planeElement = document.getElementsByClassName("plane")[0];
// set our initial parameters (basic uniforms)
const params = {
vertexShaderID: "plane-vs", // our vertex shader ID
fragmentShaderID: "plane-fs", // our fragment shader ID
uniforms: {
time: {
name: "uTime", // uniform name that will be passed to our shaders
type: "1f", // this means our uniform is a float
value: 0,
},
},
};
// create our plane using our curtains object, the HTML element and the parameters
const plane = new Plane(curtains, planeElement, params);
plane.onReady(() => {
// set an event listener to start our playback
document.getElementbyId("start-playing").addEventListener("click", () => {
plane.playVideos();
});
}).onRender(() => {
// use the onRender method of our plane fired at each requestAnimationFrame call
plane.uniforms.time.value++; // update our time uniform value
});
});

And that's it. Check the video examples (and source codes) if you want to see what's possible.

Using canvas as texture

Last but not least, you can use a canvas as a texture. It is once again really easy to use. You just have to insert a canvas tag inside your HTML, or eventually create it in your javascript and load it using the loadCanvas method.

HTML

<!-- div used to create our plane -->
<div class="plane">
<!-- canvas that will be used as textures by our plane -->
<canvas id="canvas-texture" data-sampler="uCanvas"></canvas>
</div>

You can use multiple canvases and data-sampler attributes as well, like you'd do with images or videos.

Javascript

The javascript code remains almost the same. We just set the size of our canvas, get its context and draw a simple rotating red rectangle inside our animation loop.

import {Curtains, Plane} from "curtainsjs";
// wait for everything to be ready
window.addEventListener("load", () => {
// set up our WebGL context and append the canvas to our wrapper
const curtains = new Curtains({
container: "canvas"
});
// get our plane element
const planeElement = document.getElementsByClassName("plane")[0];
// set our initial parameters (basic uniforms)
const params = {
vertexShaderID: "plane-vs", // our vertex shader ID
fragmentShaderID: "plane-fs", // our fragment shader ID
uniforms: {
time: {
name: "uTime", // uniform name that will be passed to our shaders
type: "1f", // this means our uniform is a float
value: 0,
},
},
};
// create our plane using our curtains object, the HTML element and the parameters
const plane = new Plane(curtains, planeElement, params);
// our texture canvas
const textureCanvas = document.getElementById("canvas-texture");
const textureCanvasContext = textureCanvas.getContext("2d");
// get our plane dimensions without triggering reflow
const planeBoundingRect = plane.getBoundingRect();
// set the size of our canvas
textureCanvas.width = planeBoundingRect.width;
textureCanvas.height = planeBoundingRect.height;
// use the onRender method of our plane fired at each requestAnimationFrame call
plane.onRender(() => {
plane.uniforms.time.value++; // update our time uniform value
// here we will handle our canvas texture animation
// clear scene
textureCanvasContext.clearRect(0, 0, textureCanvas.width, textureCanvas.height);
// continuously rotate the canvas
textureCanvasContext.translate(textureCanvas.width / 2, textureCanvas.height / 2);
textureCanvasContext.rotate(Math.PI / 360);
textureCanvasContext.translate(-textureCanvas.width / 2, -textureCanvas.height / 2);
// draw a red rectangle
textureCanvasContext.fillStyle = "#ff0000";
textureCanvasContext.fillRect(textureCanvas.width / 2 - textureCanvas.width / 8, textureCanvas.height / 2 - textureCanvas.height / 8, textureCanvas.width / 4, textureCanvas.height / 4);
});
});

Adding post-processing

You can add post-processing to your scene by using a ShaderPass object. It uses FBO (short for Frame Buffer Objects) under the hood and allows some really cool effects.

import {Curtains, Plane, ShaderPass} from "curtainsjs";
// wait for everything to be ready
window.addEventListener("load", () => {
// "canvas" is the ID of our HTML container element
const curtains = new Curtains({
container: "canvas"
});
// get our plane element
const planeElement = document.getElementsByClassName("plane")[0];
// set our initial parameters (basic uniforms)
const params = {
vertexShaderID: "plane-vs", // our plane vertex shader ID
fragmentShaderID: "plane-fs", // our plane fragment shader ID
uniforms: {
time: {
name: "uTime", // uniform name that will be passed to our shaders
type: "1f", // this means our uniform is a float
value: 0,
},
},
};
// create our plane using our curtains object, the HTML element and the parameters
const plane = new Plane(curtains, planeElement, params);
plane.onRender(() => {
// use the onRender method of our plane fired at each requestAnimationFrame call
plane.uniforms.time.value++; // update our time uniform value
});
// now that we've added a plane, add post processing
// our shader pass parameters
const passParams = {
vertexShaderID: "my-shader-pass-vs", // ID of your shader pass vertex shader script tag
fragmentShaderID: "my-shader-pass-fs", // ID of your shader pass fragment shader script tag
uniforms: { // uniforms are what will allow you to interact with your shader pass
time: {
name: "uTime", // uniform name that will be passed to our shaders
type: "1f", // this means our uniform is a float
value: 0, // initial value of the uniform
},
},
};
// add our shader pass using our curtains object and the parameters
const shaderPass = new ShaderPass(curtains, passParams);
shaderPass.onRender(function() {
shaderPass.uniforms.time.value++; // update our time uniform value
});
});

Post-processing shaders are a bit different than plane shaders. They do not have any projection or model view matrix and they also silently create a render texture that will hold our scene (called uRenderTexture in our fragment shader).
Here are some very basic vertex and fragment shaders example, that will use the same effect as our basic plane example seen above.

Post processing vertex shader

precision mediump float;
// those are the mandatory attributes that the lib sets
attribute vec3 aVertexPosition;
attribute vec2 aTextureCoord;
// pass your vertex and texture coords to the fragment shader
varying vec3 vVertexPosition;
varying vec2 vTextureCoord;
void main() {
gl_Position = vec4(aVertexPosition, 1.0);
// set the varyings
// use our aTextureCoord attributes as texture coords in our fragment shader
vTextureCoord = aTextureCoord;
vVertexPosition = aVertexPosition;
}

Post processing fragment shader

precision mediump float;
// get our varyings
varying vec3 vVertexPosition;
varying vec2 vTextureCoord;
// the uniform we declared inside our javascript
uniform float uTime;
// our render texture (our WebGL scene)
uniform sampler2D uRenderTexture;
void main() {
// get our texture coords from our varying
vec2 textureCoord = vTextureCoord;
// displace our pixels along the X axis based on our time uniform
// textures coords are ranging from 0.0 to 1.0 on both axis
textureCoord.x += sin(textureCoord.y * 25.0) * cos(textureCoord.x * 25.0) * (cos(uTime / 50.0)) / 25.0;
// map our texture with the texture matrix coords
gl_FragColor = texture2D(uRenderTexture, textureCoord);
}

You can also load images, videos or canvases into your shader pass, as you'd do with a regular plane.

Finally, if you want to apply your shader pass to just a set of planes instead of your whole scene, you'll have to pass a RenderTarget element as a parameter. See Assigning a RenderTarget to a ShaderPass.

Performance tips

  • If you experience a small sync latency between planes and DOM elements on mobile while scrolling, here's a GitHub discussion explaining how to solve it.
  • Try to use only one global request animation frame loop and one scroll event listener in your application. You could either hook to the library onRender() and onScroll() events or handle this by yourself by not instancing them in the first place thanks to the init params.
  • Disable and reenable the scene drawing each time you can. This can save a lot of performance and battery usage when your WebGL scene is idling.
  • You can try to use a rendering scale lower than 1 to improve performance (see the Curtains class init parameters). This will however decrease the rendering quality.
  • Always add a crossorigin attribute to your images and videos HTML elements. It will prevent them from being loaded a second time when it is uploaded to the GPU.
  • Plane's canvases textures are updated at each frame (videos are updated each time a new frame is available), which has a significant impact on performance. When those textures are not visible (if they are hidden by another texture, or if you have finished drawing on your canvas...), you should set those textures shouldUpdate property to false, and switch it back to true before displaying them again.
  • Large images have a bigger impact on performance. Try to scale your images so they will fit your plane maximum size. It goes the same for videos of course: try to keep them as light as possible.
  • Render targets (and therefore shader passes) disable the WebGL context default antialiasing. If you use them, you should set the antialias Curtains property to false when initiating your context.
    You might then want to add an extra antialiasing pass, like a FXAAPass. See the Post processing scrolling wheel with custom transform origin for an example of how to add one.
  • Shader passes could be expensive, use them with caution.
  • Try to use as less javascript as possible in the onRender() methods as this get executed at each draw call.